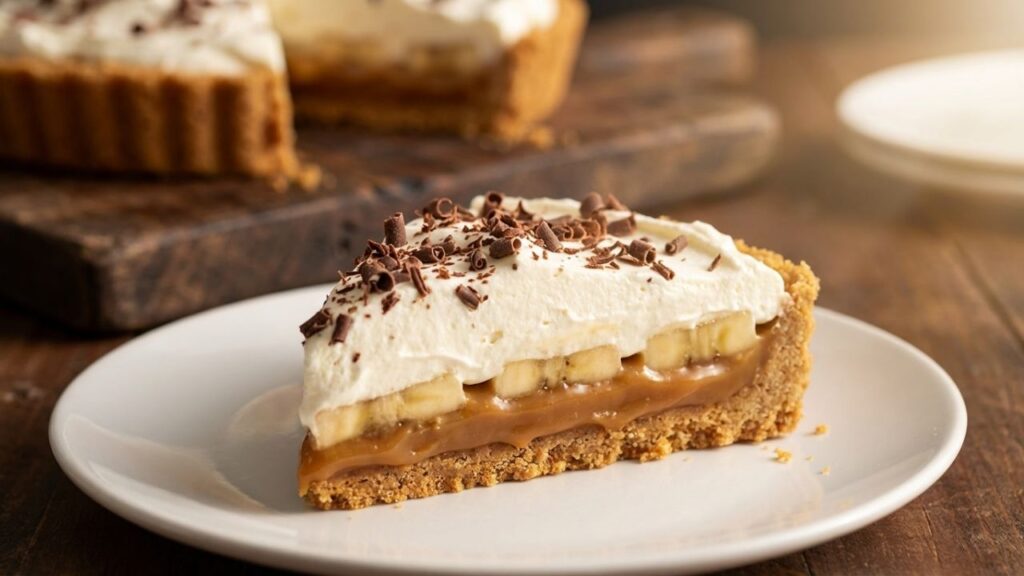
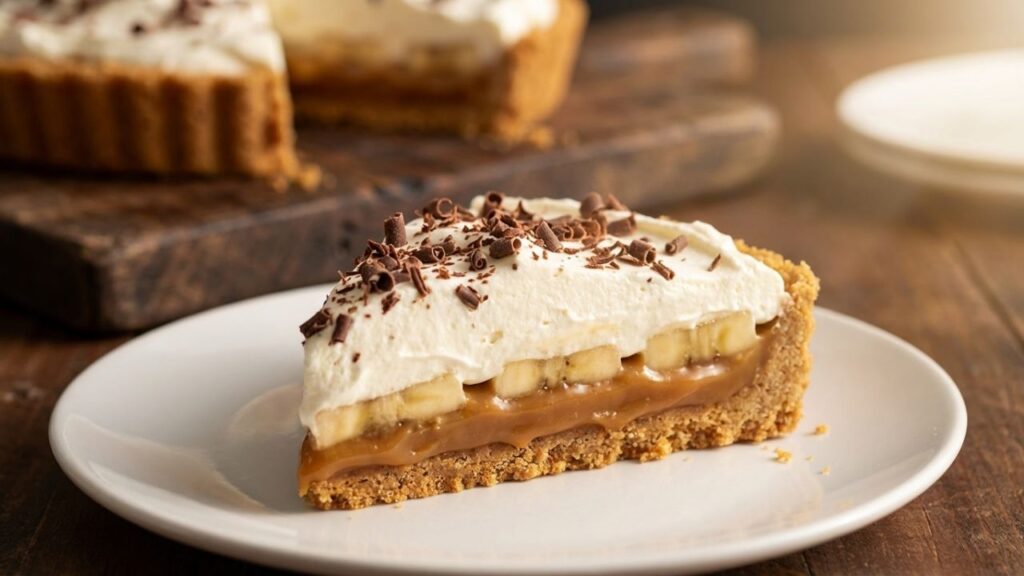
This easy banoffee pie recipe needs no baking! Just 5 minutes prep with biscuits, caramel, bananas & cream. Perfect dessert in hours, not minutes!

Ever get hit with that intense dessert craving at the worst possible time? You know the feeling—you want something sweet, creamy, and absolutely indulgent, but the thought of preheating an oven and waiting hours makes you want to give up entirely. That’s exactly when this easy banoffee pie recipe becomes your new best friend!
I first discovered banoffee pie during a trip to England, and I was completely hooked after the first bite. The genius combination of buttery biscuits, rich caramel, sweet bananas, and pillowy whipped cream was everything I never knew I needed. The best part? This easy banoffee pie recipe requires absolutely zero baking. Not a single minute in the oven. Just simple assembly, a bit of patience while it chills, and you’ve got yourself a dessert that looks and tastes like you spent all day in the kitchen.
What makes this easy banoffee pie recipe so special is how forgiving it is. There’s no temperamental dough to roll out, no precise baking times to worry about, and no complicated techniques. If you can crush biscuits, stir melted butter, and whip cream, you can make this pie. It’s become my go-to for last-minute dinner parties, potlucks, and those moments when I just want to treat myself without the fuss. Trust me, once you try this easy banoffee pie recipe, you’ll wonder why you ever thought dessert had to be complicated
Recipe Information
Servings: 8-10 slices
Prep Time: 15 minutes
Chilling Time: 2 hours (or overnight)
Total Time: 2 hours 15 minutes
Calories: 420 per slice

Ingredients
For the Biscuit Base:
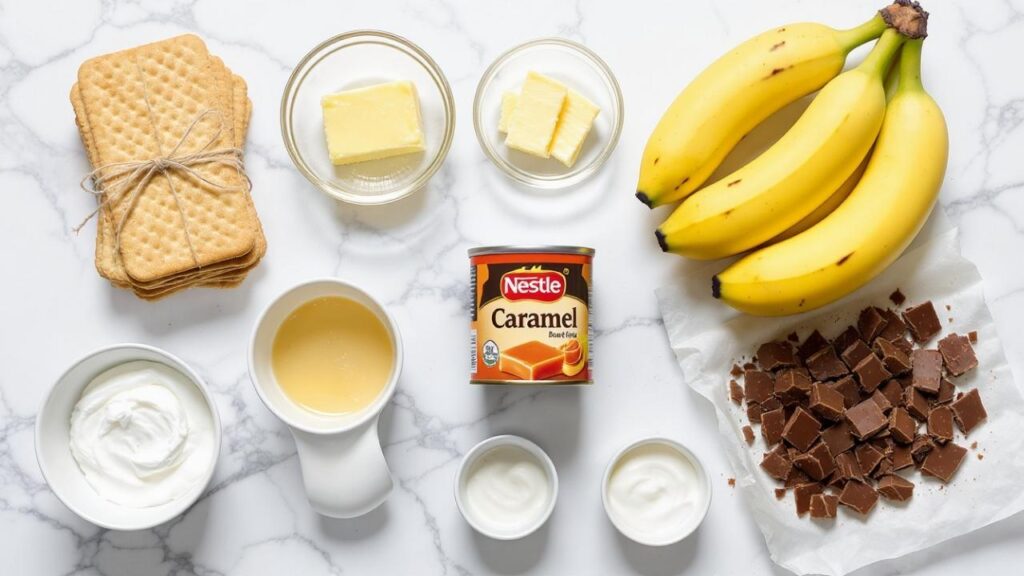
- 200g (7 oz) digestive biscuits (about 12-14 biscuits)
- 60g (4 tbsp) unsalted butter, melted
For the Filling:
- 1 tin (397g) sweetened condensed milk caramel (Nestle Carnation or dulce de leche)
- 4 ripe medium bananas
For the Topping:
- 270ml (1 cup + 2 tbsp) double cream or heavy whipping cream, cold
- 2-3 squares milk chocolate (for decoration)
Equipment Needed:
- 8-inch round loose-bottomed tart tin or springform pan
- Food processor or rolling pin
- Mixing bowls
- Electric mixer or whisk
- Spatula
Instructions
Step 1: Create the Biscuit Base
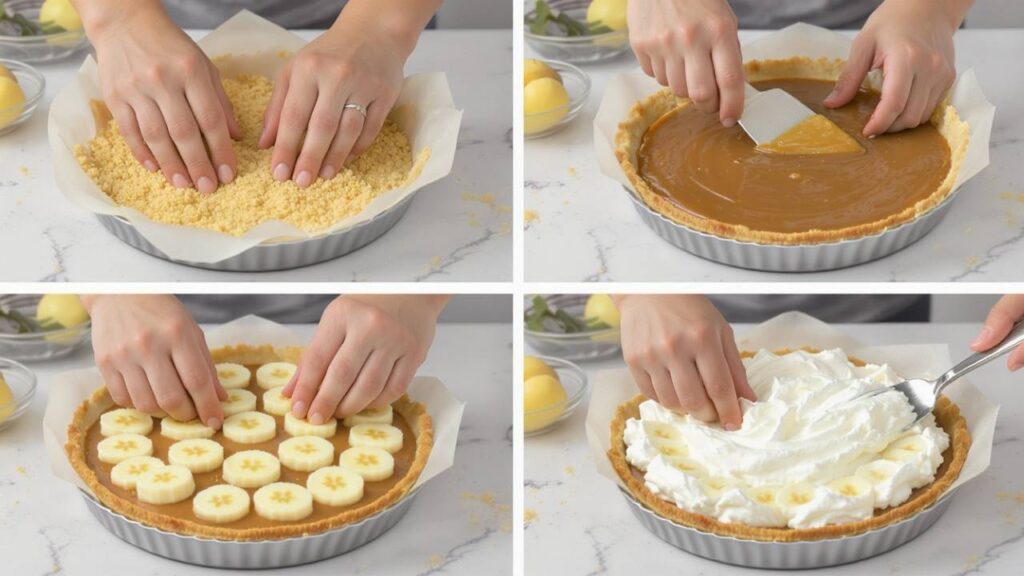
Place the digestive biscuits in a food processor and pulse until they become fine crumbs. If you don’t have a processor, put them in a sealed plastic bag and crush them with a rolling pin—it’s surprisingly therapeutic! You want a sandy texture with no large chunks. Pour the melted butter over the crumbs and mix thoroughly until every crumb is coated and the mixture looks like wet sand. This easy banoffee pie recipe starts with a solid foundation, so make sure your biscuits are evenly moistened.
Step 2: Press and Chill the Base
Tip the buttery crumb mixture into your 8-inch tin. Using the back of a spoon or the flat bottom of a glass, press the mixture down firmly and evenly across the base. Make sure to compact it well—a loose base will crumble when you slice. Spread it slightly up the sides if you have enough mixture. Pop the tin in the refrigerator for 15-20 minutes to firm up while you prepare the other layers.
Step 3: Spread the Caramel Layer
Remove the chilled base from the fridge. Open your tin of caramel and give it a quick stir if it seems thick. Spoon the caramel onto the biscuit base and use a spatula to spread it into a smooth, even layer covering the entire surface. The caramel layer in this easy banoffee pie recipe provides that signature toffee sweetness, so don’t be stingy! Return the tin to the fridge while you prep the bananas and cream.

Step 4: Slice the Bananas
Peel your ripe bananas and slice them into rounds about ¼ to ½ inch thick. Try to keep them relatively uniform so they layer nicely. Arrange the banana slices over the caramel in a single layer, or create multiple layers if you’re a banana lover! Make sure to cover the caramel evenly. The bananas add natural sweetness and a creamy texture that makes this easy banoffee pie recipe absolutely irresistible.
Step 5: Whip the Cream
In a large, chilled mixing bowl, pour the cold double cream. Using an electric mixer or a whisk (get ready for an arm workout!), whip the cream until it forms soft peaks. This should take about 2-3 minutes with an electric mixer. You want it thick and cloud-like but still spreadable—not stiff. Over-whipped cream becomes grainy, so stop as soon as you see those lovely soft peaks forming.
Step 6: Top with Whipped Cream
Spoon the freshly whipped cream over the banana layer. Use a spatula to spread it gently and evenly, covering all the bananas completely. You can create beautiful swirls and peaks on top for a professional look. The whipped cream not only tastes amazing but also helps prevent the bananas from browning too quickly.
Step 7: Add Chocolate Decoration
Using a fine grater or microplane, grate the milk chocolate squares over the top of the cream. Let the chocolate shavings fall naturally to create a beautiful, rustic finish. You can also use a vegetable peeler to create chocolate curls if you’re feeling fancy! This easy banoffee pie recipe looks incredible with that final chocolate touch.
Step 8: Chill and Set
Cover the pie carefully with plastic wrap or a cake dome, making sure it doesn’t touch the cream surface. Place it in the refrigerator for at least 2 hours, though overnight is even better. This chilling time allows all the layers to set properly and the flavors to meld together beautifully. The waiting is the hardest part of this easy banoffee pie recipe, but trust me—it’s worth it!
Step 9: Slice and Serve
When you’re ready to serve, carefully remove the pie from the tin. If you’re using a springform pan, just release the sides. For the cleanest slices, dip a sharp knife in hot water, wipe it dry, and cut through in one smooth motion. Wipe the knife clean between each slice. Serve immediately and watch everyone’s faces light up!

Chef’s Tips for the Perfect Easy Banoffee Pie Recipe
Biscuit Choice Matters: Digestive biscuits are traditional, but graham crackers work beautifully for US bakers. You can also try Biscoff cookies for a caramelized twist or even chocolate cookies for extra richness.
Caramel Consistency: Make sure you’re using thick, ready-made caramel (like Nestle Carnation Caramel) or dulce de leche, not regular sweetened condensed milk. The thick consistency is crucial for proper layering in this easy banoffee pie recipe.
Banana Freshness: Use ripe bananas for maximum sweetness, but make sure they’re still firm enough to slice neatly. Overripe, mushy bananas won’t hold their shape.
Prevent Browning: Bananas naturally oxidize and brown when exposed to air. The cream layer helps protect them, but for best results, assemble the banana and cream layers close to serving time if possible.
Cream Temperature: Cold cream whips better! Use cream straight from the fridge and even chill your mixing bowl and beaters for 10 minutes beforehand for the fluffiest results.
Press Firmly: Really compact that biscuit base! A loose base will crumble when you cut the pie. Use the bottom of a glass to get it super firm and even.
Make-Ahead Friendly: This easy banoffee pie recipe is perfect for entertaining because you can make it the night before. Just add the chocolate shavings right before serving to keep them looking fresh.
Variations to Try
Chocolate Base: Use chocolate digestives or add 2 tablespoons of cocoa powder to your biscuit crumbs for a chocolate twist on this easy banoffee pie recipe.
Coffee Infusion: Dissolve 1 teaspoon of instant espresso powder into the melted butter before mixing with the biscuits for a subtle coffee flavor that complements the caramel beautifully.
Salted Caramel: Sprinkle a pinch of flaky sea salt over the caramel layer before adding the bananas. The sweet-salty combination is incredible!
Nut Crunch: Sprinkle chopped pecans, walnuts, or toasted hazelnuts over the caramel or fold them into the biscuit base for extra texture.
Dark Chocolate Drizzle: Melt some dark chocolate and drizzle it over the finished pie for an elegant presentation and deeper chocolate flavor.
Individual Portions: Make this easy banoffee pie recipe in individual glasses or jars for a fun presentation. Layer the components in clear glasses to show off all those gorgeous layers!
Storage Instructions
Refrigerator: Store your banoffee pie covered in the refrigerator for up to 2 days. The bananas are best within the first 24 hours but will still taste great the second day, though they may brown slightly.
Freezing: While you technically can freeze the biscuit base with caramel, I don’t recommend freezing the assembled pie. The bananas and whipped cream don’t freeze well and will become watery when thawed.
Serving Temperature: This easy banoffee pie recipe is best served cold, straight from the fridge. The layers need to stay chilled to maintain their structure.
Leftovers: If you have leftover slices, cover them tightly with plastic wrap and refrigerate. They’re perfect for breakfast the next morning—no judgment here!
Nutrition Information
Per Serving (1 slice):
- Calories: 420 kcal
- Protein: 5g
- Carbohydrates: 52g
- Fat: 22g
- Saturated Fat: 13g
- Fiber: 2g
- Sugar: 38g
- Sodium: 180mg
- Cholesterol: 55mg
Note: Nutrition information is approximate and based on 10 servings. Values may vary depending on specific brands and any modifications you make to this easy banoffee pie recipe.
Frequently Asked Questions
Can I use a different type of biscuit for the base?
Absolutely! While digestive biscuits are traditional in this easy banoffee pie recipe, graham crackers are the perfect American substitute. Lotus Biscoff cookies, shortbread, or even Oreos (remove the cream first) work wonderfully. Just make sure whatever you choose has enough butter to hold together.
Can I make my own caramel instead of using canned?
You can, though it defeats the “easy” part of this easy banoffee pie recipe! If you want to make homemade caramel, you’ll need to cook sweetened condensed milk for several hours. The canned caramel is foolproof and saves so much time.
Why is my biscuit base falling apart?
This usually means either you didn’t add enough butter or you didn’t press it firmly enough. The mixture should feel like wet sand and hold together when squeezed. Press it down very firmly into the tin—don’t be gentle!
How do I keep the bananas from turning brown?
The whipped cream layer provides some protection, but bananas will naturally oxidize over time. For the freshest look, assemble this easy banoffee pie recipe no more than 24 hours before serving. A light brush of lemon juice on the banana slices can help, but don’t overdo it or you’ll taste it.
Can I make this dairy-free?
Yes! Use dairy-free butter for the base, check that your caramel is dairy-free (some brands are), and substitute coconut cream for the double cream. Make sure to chill a can of full-fat coconut cream overnight, then whip only the solid cream that rises to the top. This easy banoffee pie recipe adapts well to dietary needs!
Why This Easy Banoffee Pie Recipe Works
The genius of banoffee pie lies in its simplicity and the perfect balance of flavors and textures. According to food science experts at King Arthur Baking, the combination of buttery, crunchy bases with creamy fillings creates what’s called “textural contrast”—one of the key elements that makes desserts so satisfying.
The caramel in this easy banoffee pie recipe provides deep, complex sweetness from the Maillard reaction that occurs when milk proteins and sugars are heated together. Bananas add natural sweetness and creamy texture while also providing pectin, which helps the pie hold together slightly. The whipped cream’s fat content balances the sweetness and creates that luxurious mouthfeel we crave in desserts.
Chilling is essential because it allows the butter in the base to resolidify, making it sturdy enough to slice. It also gives the flavors time to marry together, creating a more cohesive taste experience in every bite of this easy banoffee pie recipe.
Similar Recipes You’ll Love
If this easy banoffee pie recipe has won your heart, you’ll want to explore these other no-bake desserts:
- Craving more no-bake magic? Try our no-bake cheesecake recipe that uses similar techniques and is just as impressive.
- Love the caramel-banana combo? Our caramel banana bread pudding takes those flavors in a cozy, comforting direction.
- Want another quick dessert? Check out our chocolate mousse cups that come together in minutes.
Join Our Dessert-Loving Community
Did you make this easy Banoffee pie recipe? I’d absolutely love to see your creation! Take a photo of your beautiful pie and share it with our community—your success inspires others to try their hand at this incredible dessert.
📱 Follow us for more easy dessert recipes:
- Instagram: @organicrecipeguide – Daily dessert inspiration and drool-worthy photos
- Facebook: Organic Recipe Guide – Join thousands of dessert lovers in our community
- Pinterest: Organic Recipe – Save this easy Banoffee pie recipe and discover more no-bake treats
- TikTok: @pinrecipe99 – Watch quick recipe videos and baking hacks
- YouTube: Organic Recipe Guide – Step-by-step video tutorials for this easy Banoffee pie recipe and more
Leave a comment below and tell me how your pie turned out! Did you try any of the variations? What’s your favorite layer? I read every comment and love hearing about your baking adventures!
This easy Banoffee pie recipe has become one of my most-requested desserts, and for good reason. It’s proof that you don’t need complicated techniques or hours in the kitchen to create something truly spectacular. With just five simple ingredients and minimal effort, you can serve a dessert that looks like it came from a fancy bakery.
Whether you’re a complete beginner or an experienced baker looking for something quick and impressive, this easy Banoffee pie recipe delivers every single time. The buttery base, silky caramel, fresh bananas, and clouds of cream create a harmony of flavors and textures that never fails to wow.
So next time you need a dessert that’s guaranteed to impress without the stress, remember this easy Banoffee pie recipe. It’s waiting to become your new go-to for every occasion—from casual family dinners to special celebrations. Trust me, once you make this, you’ll be making it again and again!
Happy no-baking! 🍌🍮
